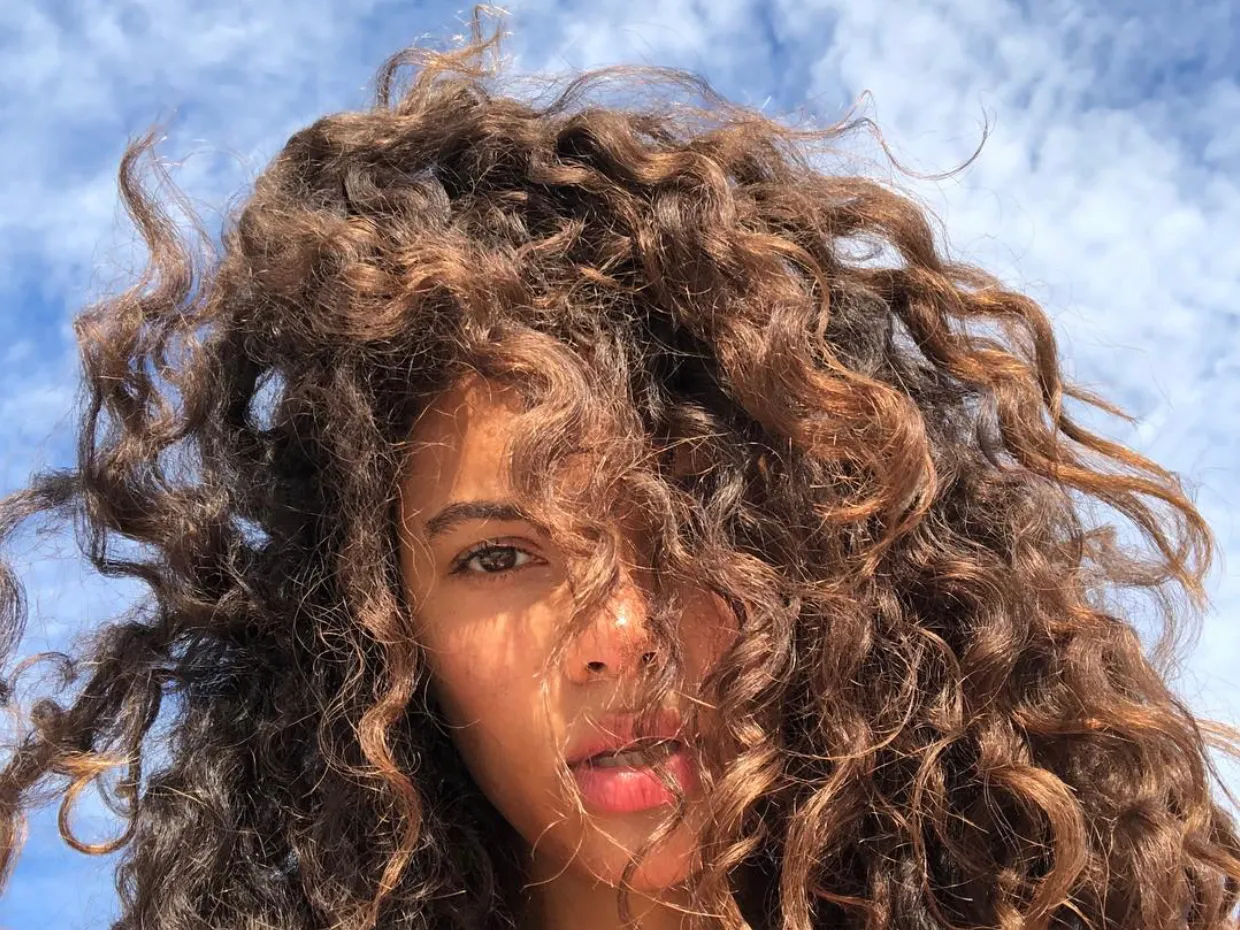
 You’ve never had curly hair before, or you don’t know how to do it, you’re in for a transcendent experience. I’m not kidding. Plopping is a drying technique that enhances and retains wet curls while minimizing frizz/flyaways as it dries, and it’s probably one of the easiest and biggest game-changing techniques for 2c to 3b hair types (2b hair looser or tighter 3c hair? Don’t worry – there’s a modification for you here, too).
No, I’m not exaggerating. Like, when I started blowing up my 2c/3a hair, my slim curls suddenly became dry and had great volume, definition and consistency. It was magical. The only warning? Puffing may require some practice and experimentation first (think: a few weeks of iterations), but I promise the results are worth the hassle. So to help you get started learning how to puff, I’ve broken down the exact instructions, tips and – yes – video tutorials your hair type will need. Prepare for some really great curls.
What is curly hair puffing?
Plopping is a technique of drying wet curls using a cotton t-shirt (or pillowcase, or microfiber towel) in a separate mound on top of your head to help add definition and reduce frizz. Basically, it’s a curl-approved alternative to wrapping a towel around your head.
Why is a flap flap flap better than an ol’ twist-towel? Heck, because when you wrap and twist your curls with a towel, they get stretched (from the twist) and curled (from your rough, knotted towel). However, puffing and flopping allows your damp curls to compact and curl like an accordion style on top of your head, so your roots stay voluminous, your curls stay clumped, and your hair cuticle stays smooth (thanks to the soft cotton fabric). Here’s a short visual.
Does flopping apply to all hair types?
No. If you don’t already have curls (or a tight wavy pattern), flutter flutter won’t give you curls. If you have wavy, almost curly hair (think: 2c type), a flutter flutter can help your waves come together better and look more defined, so it’s definitely worth trying to see how your hair reacts. If it doesn’t work for your waves, don’t worry – there’s a modification option below.
Likewise, puff puff does not work on super tight curly or type 4 hair as it tends to absorb moisture and prolong the drying process, while there is a high risk of tangles and fairy tale knots being rubbed and flipped due to the required curl. This is not to say that some 3c or 4a hair types are not possible to get good draping, but in general, draping seems to work best on 2c, 3a and 3b hair types.
This leaves us with…
How to do your hair
So, depending on your hair type and what you use (i.e. t-shirt, microfiber towel or pillowcase), there are some variations on how you can style your hair. I’ve tried all three and I’ve found that using a t-shirt – especially a huge long-sleeved t-shirt – is the easiest, most effective, and most consistent way to get the most results.
So with that in mind, here’s how to puff curls (keep scrolling to learn how to puff wavy hair and curls, although you can always start with this original puff method first, as it usually works very well)
How to wear it with a t-shirt (my favorite)
1. Buy yourself a big T-shirt. Unofficial favorite Internet option? An XXL long-sleeve cotton t-shirt (I use this Soffe men’s shirt for as low as $10. Whattup).
2. before showering, place the t-shirt upside down – i.e. with the sleeves and collar closest to you – on the bathroom counter, chair or toilet lid (hey, I did this whole college thing and I was fine).
3. after showering and using a styler (especially one you normally use on wet hair, such as a leave-in conditioner or gel), flip your wet hair over and place it in the center of your t-shirt, pressing your head down like an accordion to curl your hair.
4. with your head/hair still upside down, grab the end of the shirt furthest from your head and fold it over your hair/head (so that it touches the back of your neck and completely covers your hair). Think of it as making a folded bun around your curls.
5. Holding the edge of the shirt at the back of the neck, grab the sleeves near the forehead and twist them together to tighten the “bun” around your head. 6.
Wrap the twisted sleeves around your head and tie them in place to prevent the shirt from slipping or falling off. If you look like you’re wearing some kind of wet helmet, congratulations – you’re doing it right.
Once you turn your head over, all your curls will fit perfectly on top of your head like a bunch of compressed tights, allowing them to dry naturally, unaffected by gravity, humidity or towel roughness. This means that by the time you open the shirt, your curls will have already started to dry with better definition and volume, without any frizz.
How to Puff Curls (or Fine Hair)
A common complaint is that fine hair – especially slender curls – looks flattened, flat and messy. If you’ve done your best with the original method and you know it’s not for you, try using the slinky method.
This tutorial from FitKat Style shows a flutter modification for fine, wavy or loose curls. Essentially, you simply open your hands (and t-shirt) to soak up the hair to help create and define your waves without any of the weird curls, creases or bends that come with a flop. It’s so easy, all you need is a regular t-shirt or microfiber towel.
How to make curls tighter (3b/3c)
Okay, it sounds crazy, but certain curl types – especially tighter curl types – have gotten awesome results from this modification. Net puffing means using a fishnet stocking (!) before spreading your hair out puffing your hair. Why does this work? Because it prevents your curls from getting mussed up as they often do with puffing, and it also creates more airflow within your hair while spreading it out.
Note: A hair net will not completely blow dry your hair (especially your roots), but it helps to promote major curl definition early in the process, which is especially helpful for low density, fine curls. The method was originally inspired by content creator Penny Tovar, who used a wig cap, but was then popularized by HiF3licia, who experimented with fishing nets instead.
Of all the puffing methods out there, this one is definitely experimental — but still worth a try! — works best if you pull the nets out first (actually gluing them to your legs to really expand the net).
How long do you keep your hair?
There’s really no right or wrong answer here – some people only puff for 5-10 minutes, some puff for 15-20 minutes, others puff for an hour, and some swear by puffing overnight while they sleep. How long you fluff your hair depends on your hair type, length, porosity and lifestyle, so this is one of those times where experimentation is required (as you can clearly see by now).
I personally find that curling my fine, low porosity hair for 15-20 minutes is the perfect point to encourage definition and absorb enough excess moisture. Anything longer than 20 minutes makes my curls a little too dry, which makes it difficult to add product afterwards without risking frizz or messing up my curl pattern. I’ve also tried puffing overnight and found – and this is a common complaint – that my hair is too wet and ends up making my scalp itchy (dandruff/yeast growth loves a damp scalp).
More hair tutorials
Listen, as you should know by now, what works for one’s curls may not work for yours – and floppy floppy is no exception. While the standard long-sleeve curl method worked great for my 2c/3a curls, a short-sleeve t-shirt, microfiber towel, or some other technique you make yourself may yield better results.
Nevertheless, to get you started with zero excuses or hesitation, check out these additional tutorials below and get ready to have really great curls.
Yes, please feel free to send me your happiness afterwards.